Sunday, March 19, 2023

Transfer Learning By PreTrained model || Brain_Tumor Detection using NasNetLarge function


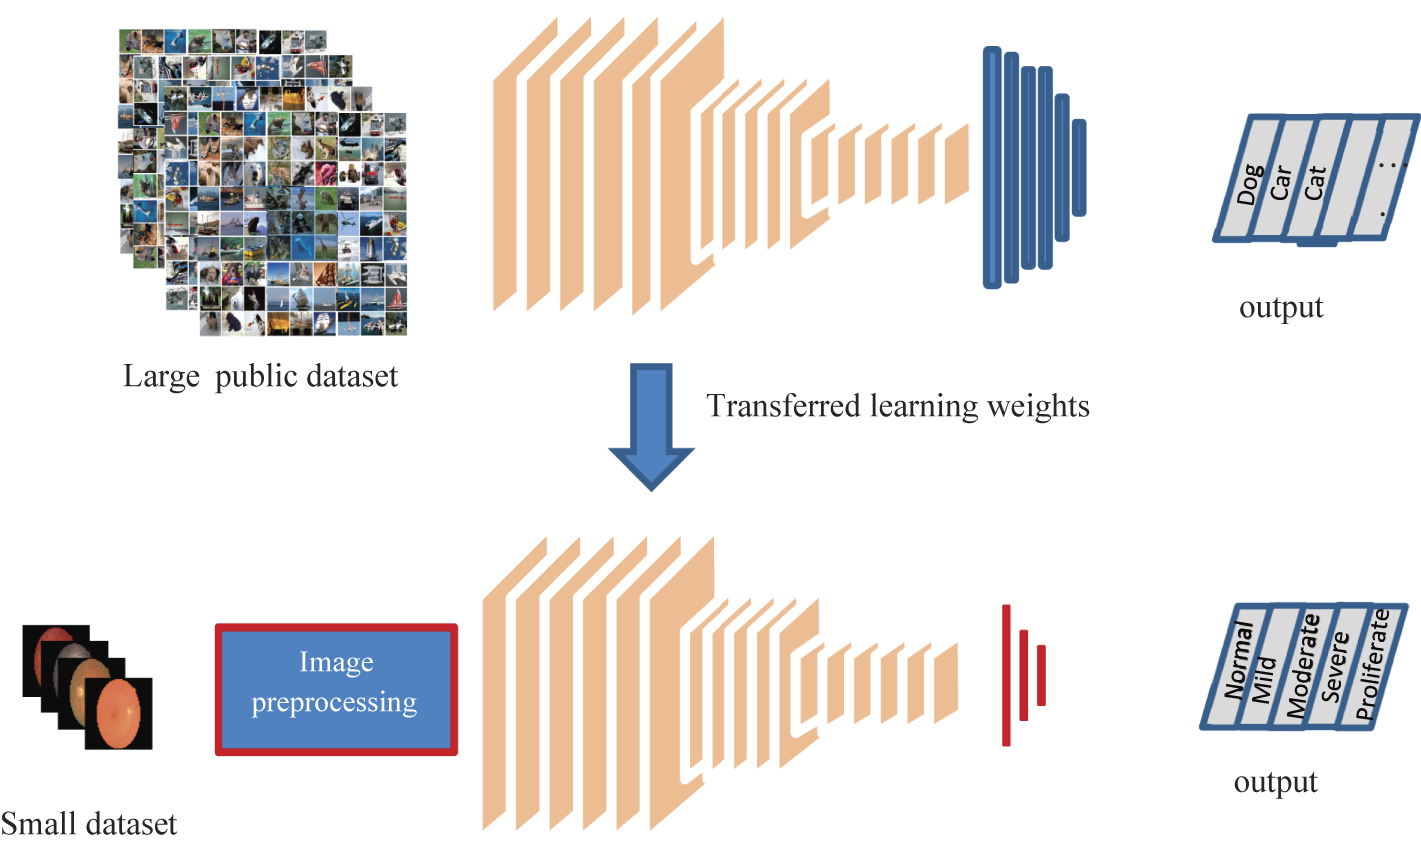
Transfer learning is a machine learning technique that involves leveraging a pre-trained neural network to solve a new problem. The pre-trained neural network is typically trained on a large dataset and has learned to identify and extract meaningful features from the data. By using a pre-trained neural network, we can take advantage of the knowledge that the network has already learned and use it to improve the accuracy of our new model.


In the case of brain tumor detection, we can use a pre-trained neural network like NasNetLarge to improve the accuracy of our model. NasNetLarge is a deep convolutional neural network architecture that has been trained on the ImageNet dataset, which contains millions of images belonging to thousands of classes. It has been shown to perform very well on a variety of image classification tasks.


To use NasNetLarge for brain tumor detection, we can follow these steps:

  1. Load the pre-trained NasNetLarge model
  2. Replace the final layer of the model with a new fully connected layer that has a single output node for binary classification (tumor vs. no tumor)
  3. Freeze the weights of all the layers in the pre-trained model except for the new final layer
  4. Train the model on our brain tumor dataset, fine-tuning the weights of the new final layer to optimize performance
  5. Evaluate the performance of the model on a test set

By using transfer learning in this way, we can achieve high accuracy with relatively little data, as we are leveraging the knowledge already learned by the pre-trained model. This can be especially useful in medical imaging applications where obtaining large amounts of labeled data can be challenging.

Here's a Python code for brain tumor detection using the NasNetLarge pre-trained network for transfer learning:

import tensorflow as tf from tensorflow.keras.preprocessing.image import ImageDataGenerator from tensorflow.keras.layers import Dense, GlobalAveragePooling2D from tensorflow.keras.models import Model from tensorflow.keras.optimizers import Adam # Load the NasNetLarge model and its pre-trained weights base_model = tf.keras.applications.NasNetLarge(weights='imagenet', include_top=False) # Freeze the layers of the base model so they're not trained during transfer learning for layer in base_model.layers: layer.trainable = False # Define the top layers of the model for classification x = base_model.output x = GlobalAveragePooling2D()(x) x = Dense(512, activation='relu')(x) predictions = Dense(1, activation='sigmoid')(x) # Define the complete model model = Model(inputs=base_model.input, outputs=predictions) # Compile the model with an Adam optimizer and binary cross-entropy loss model.compile(optimizer=Adam(learning_rate=0.001), loss='binary_crossentropy', metrics=['accuracy']) # Define data generators for training and validation data train_datagen = ImageDataGenerator(rescale=1./255, shear_range=0.2, zoom_range=0.2, horizontal_flip=True) val_datagen = ImageDataGenerator(rescale=1./255) train_generator = train_datagen.flow_from_directory('path/to/training/data', target_size=(224, 224), batch_size=32, class_mode='binary') val_generator = val_datagen.flow_from_directory('path/to/validation/data', target_size=(224, 224), batch_size=32, class_mode='binary') # Train the model with the generators and a specified number of epochs model.fit(train_generator, steps_per_epoch=len(train_generator), epochs=10, validation_data=val_generator, validation_steps=len(val_generator)) # Save the trained model for later use model.save('path/to/saved/model')


In this code, we're using the NasNetLarge pre-trained network from Keras, which has already been trained on the ImageNet dataset to classify images into 1,000 different categories. We then add our own classification layers to the top of the network, freeze the pre-trained layers, and train the new layers on our own data to classify brain tumor images as either positive or negative. We use an Adam optimizer with a binary cross-entropy loss function, and train the model using data generators for both the training and validation data. Finally, we save the trained model for future use.

What is Asynchronous programming in Python


Asynchronous programming in Python allows you to write concurrent and non-blocking code that can handle multiple tasks simultaneously. In asynchronous programming, instead of waiting for a task to complete before moving onto the next one, you can start multiple tasks and switch between them when one of them is blocked, such as when waiting for input/output (I/O) operations or other types of system calls.


In Python, you can use the asyncio module to write asynchronous code. This module provides a way to write coroutines, which are special functions that can be paused and resumed at any point in their execution. Coroutines can be thought of as lightweight threads that can run concurrently and cooperatively with other coroutines.

To create a coroutine, you use the async def syntax to define a function that can be paused and resumed. Inside the coroutine, you can use the await keyword to pause the coroutine and wait for an asynchronous operation to complete, such as an I/O operation or another coroutine.

Here's an example of a simple coroutine that waits for a specified number of seconds before printing a message:

import asyncio async def wait_and_print(message, delay): await asyncio.sleep(delay) print(message) asyncio.run(wait_and_print("Hello, world!", 1))

In this example, the wait_and_print coroutine uses the asyncio.sleep function to wait for the specified delay, and then prints the message. The asyncio.run function is used to run the coroutine and wait for it to complete.

Asynchronous programming can be more complex than traditional synchronous programming, but it can be very useful for building high-performance and responsive applications that can handle many concurrent tasks.


Asynchronous using threadPoolExecuter

Asynchronous programming involves executing tasks or operations independently from the main program flow, so that the program can continue to perform other tasks while waiting for the asynchronous tasks to complete. In Java, the ThreadPoolExecutor class is commonly used to implement asynchronous processing with threads.

A thread pool is a collection of pre-initialized threads that are ready to execute tasks. The ThreadPoolExecutor manages the thread pool and assigns tasks to threads for execution. The advantage of using a thread pool is that it minimizes the overhead of creating and destroying threads, as well as the overhead of switching between threads.

When using the ThreadPoolExecutor for asynchronous programming, tasks are submitted to the executor using the submit() method. This method returns a Future object that represents the result of the task execution. The program can continue to execute other tasks while the submitted task is being executed asynchronously in the background.

Here is an example of how to use the ThreadPoolExecutor for asynchronous programming:

ExecutorService executor = Executors.newFixedThreadPool(5); Future<String> future = executor.submit(new Callable<String>() { public String call() throws Exception { // Perform some long-running task asynchronously return "Task completed"; } }); // Do other work while the task is running asynchronously String result = future.get(); // Wait for the task to complete and get the result System.out.println(result);

In this example, the newFixedThreadPool() method creates a thread pool with 5 threads. The submit() method is called with a Callable object that performs some long-running task asynchronously. The get() method is called on the Future object to wait for the task to complete and retrieve the result. Meanwhile, the program can continue to perform other tasks while the submitted task is running asynchronously in the background.

Asynchronous using processPoolExecuter:

Asynchronous programming is a programming paradigm that allows multiple tasks to run concurrently without blocking each other. This can be achieved using various techniques, such as threads, coroutines, and asynchronous functions.

The ProcessPoolExecutor class in Python's concurrent.futures module provides a way to execute multiple functions concurrently in separate processes. This can improve the performance of CPU-bound tasks by utilizing multiple CPU cores.

When using ProcessPoolExecutor in an asynchronous manner, you can submit multiple functions to be executed concurrently without waiting for each function to complete before moving on to the next one. This is achieved using the asyncio module's run_in_executor function, which allows you to run a synchronous function in a separate process using the ProcessPoolExecutor.

Here is an example of how to use ProcessPoolExecutor asynchronously with asyncio:

import asyncio from concurrent.futures import ProcessPoolExecutor async def calculate_square(n): with ProcessPoolExecutor() as executor: result = await loop.run_in_executor(executor, calculate_square_sync, n) return result def calculate_square_sync(n): return n*n async def main(): tasks = [asyncio.create_task(calculate_square(n)) for n in range(10)] results = await asyncio.gather(*tasks) print(results) loop = asyncio.get_event_loop() loop.run_until_complete(main())

In this example, we define a coroutine function calculate_square that takes an argument n and calculates its square using a synchronous function calculate_square_sync. We use the run_in_executor function to run the synchronous function in a separate process using ProcessPoolExecutor.

We then create 10 tasks to calculate the squares of the numbers 0 to 9 concurrently using asyncio.create_task. We use asyncio.gather to wait for all the tasks to complete and collect the results in a list.

Finally, we print the results to the console. Since the functions are executed asynchronously, the order of the results may vary.


What is synchronisation in python

 In Python, synchronization refers to the coordination of multiple threads or processes to ensure that they access shared resources in a safe and consistent way.


In a multi-threaded or multi-process program, it is possible for different threads or processes to access shared data simultaneously, which can lead to race conditions, data corruption, and other errors. Synchronization techniques are used to prevent these problems by controlling access to shared resources.


Python provides several synchronization mechanisms, including locks, semaphores, and conditions. These mechanisms allow threads or processes to coordinate their access to shared resources, ensuring that only one thread or process can access the resource at a time.


For example, a lock can be used to ensure that only one thread at a time can modify a shared variable, while other threads wait for the lock to be released. Similarly, a semaphore can be used to limit the number of threads that can access a shared resource at the same time.


Synchronization is an important concept in concurrent programming, and it is essential for building reliable, scalable, and efficient multi-threaded or multi-process applications in Python.

Synchronous process using multiprocessing 

Multiprocessing allows you to run multiple processes simultaneously on multiple CPUs or CPU cores. A synchronous process using multiprocessing is one in which the processes are executed in a synchronized manner. This means that the processes must wait for each other to finish before moving on to the next step.


Here is an example of a synchronous process using multiprocessing in Python:

import multiprocessing


def worker(num):

    """worker function"""

    print('Worker:', num)

    return


if __name__ == '__main__':

    jobs = []

    for i in range(5):

        p = multiprocessing.Process(target=worker, args=(i,))

        jobs.append(p)

        p.start()


    # wait for all processes to finish

    for job in jobs:

        job.join()


In this example, we define a worker function that takes a number as an argument and prints a message indicating that it is executing. We then create five processes using the multiprocessing module, with each process executing the worker function with a different number as an argument. We store each process in a list of jobs and start each process using the start() method.


After starting all the processes, we use a for loop to iterate through the list of jobs and call the join() method on each process. This causes the main program to wait until all the processes have completed before moving on to the next step. This ensures that the processes are executed in a synchronized manner.


Note that the if __name__ == '__main__': block is necessary in this example because it ensures that the multiprocessing module is only imported and executed once, preventing issues that can occur when multiprocessing is used in conjunction with certain IDEs or interactive shells.


Featured Post

Python for Data Science: An Introduction to Pandas

Python has become the go-to language for data science due to its simplicity, flexibility, and powerful libraries. One such library is Pandas...

Popular Posts